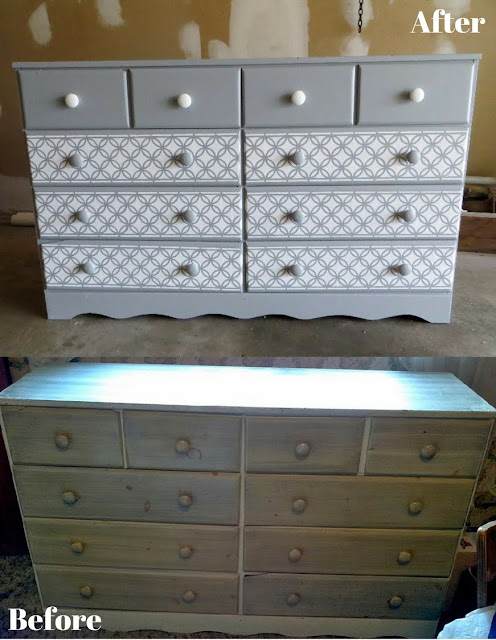
DIY TBT: Dresser Makeover
This dresser was sitting full of junk in my grandparents' house. Turns out my mom had painted and used it back when she was in high school. It had plenty of dents and dings from 40+ years of use, but I was feeling inspired by furniture makeovers on Pinterest and wanted to give it a try.
HOW TO PAINT A DRESSER
- Remove knobs/hardware
- Sand the dresser and drawers, wipe away debris
- Repair scratches, dents, or holes with wood filler
- Prime and paint the dresser and drawers (wait 4-6 hours between coats)
- Paint knobs or purchase new hardware
- Paint top of dresser with polyurethane or water-based polycrylic
- Add design elements
- Reattach knobs/hardware
I skipped the wood filler (#3) and polyurethane (#6). I didn't mind the dents and wasn't too worried about protecting the top since this was just going to college. However, next time I'll probably do both steps to give it a clean, professional look.
TIPS & TRICKS
Painting around the bottom edges can be tricky so we propped up the dresser with two PVC pipes we found in the garage.
My goofy father made "The Knob Board" so I could easily paint and dry the knobs. He also put the knob screws in a small piece of foam board so they wouldn't get lost. (Smiley faces are his infamous signature.)
Right about here I was tempted to quit and go to IKEA. The design was definitely the most laborious part. I bought a Martha Stewart Crafts stencil from Micheal's and used a foam brush to paint it. Then I did touch-ups with a small brush. Took awhile but worth it!
Ta-da!
I did this about six years ago for fun so if you're looking for a detailed step-by-step tutorial, I suggest checking out this post by Centsational Style. But I hope this inspires you to raid your parents'/grandparents' house or go to Goodwill, and give an old piece of furniture a facelift. Feel free to comment with any tips or questions.


Comments
Post a Comment